
Free Zabbix module for WHMCS

WHMCS provisioning module for Zabbix — sell network monitoring as a service. Automates account creation, suspension, termination and password changes for Zabbix users.
Features
- Automatic provisioning — creates a dedicated Host Group and user in Zabbix when an order is placed
- Tariff plans — each product has its own host limit and Zabbix role, configured directly in WHMCS Module Settings; no config files needed
- Suspend / Unsuspend — disables or re-enables the Zabbix user and stops/resumes monitoring for all their hosts
- Terminate — removes all hosts, the user, their user group and host group cleanly in the correct order
- Change Password — changes the Zabbix user password via the WHMCS interface
- Client portal — clients manage their infrastructure directly from WHMCS:
- View all added hosts with live status (Monitored / Not monitored)
- Add a host by IP address or hostname
- Choose connection type: Zabbix Agent, SNMP, or ICMP Ping
- On adding a Zabbix Agent host — receive a ready-to-use
zabbix_agentd.confand a unique 256-bit PSK encryption key (shown once) - Remove hosts
- Direct link to the Zabbix UI
- Localisation — English, Russian, Ukrainian included; any WHMCS language is supported
How it works
The module uses a super-admin API token — no manual account creation needed. Each WHMCS service maps to one isolated environment in Zabbix.
Order placed → CreateAccount
    ├── hostgroup.create   "whmcs_client_{userid}_svc_{serviceid}"
    ├── usergroup.create   "usrgrp_whmcs_client_{userid}_svc_{serviceid}"
    │                       (read-write access scoped to that host group only)
    └── user.create        "whmcs_{userid}_{serviceid}"
                            (assigned the pre-created role from Module Settings)

Order suspended → SuspendAccount
    ├── user moved to "whmcs_disabled" group → login disabled
    └── all hosts → status: not monitored

Order unsuspended → UnsuspendAccount
    ├── user restored to their original user group → login enabled
    └── all hosts → status: monitored

Order terminated → TerminateAccount
    ├── host.delete        all hosts in the client's group
    ├── usergroup.delete   client's user group
    ├── user.delete        client's user
    └── hostgroup.delete   client's host group

Password changed → ChangePassword
    └── user.update        new password applied
Host isolation
Each client can only see and interact with hosts in their own Host Group. This is enforced by Zabbix itself through the user group permissions — not by the module. Even if a client uses the Zabbix UI directly, they cannot access other clients' hosts.
PSK encryption for Zabbix Agent
When a client adds a host with type Zabbix Agent:
- The module generates a unique 256-bit PSK key using
random_bytes(32)and a unique PSK identity - The host is created in Zabbix with TLS/PSK configured
- The client receives a ready-to-use
zabbix_agentd.confand the raw PSK key — shown once only
The PSK key is never stored anywhere. If it is lost, the client removes the host and adds it again to get a new key.
User roles
The module assigns whatever Zabbix role you specify in the product's Module Settings. You are free to configure the role however you like — grant read-only access, allow template editing, restrict certain views, or anything else Zabbix roles support. The module does not enforce any specific role configuration. This gives you full flexibility to tailor the client experience to your use case.
Requirements
| Component | Version |
|---|---|
| WHMCS | 7.x or 8.x or 9.x |
| PHP | 7.4 or higher |
| PHP extensions | curl, json |
| Zabbix | 6.4 or higher (tested on 7.x) |
| Zabbix API token | Super-admin, no expiry |
Installation
1. Copy module files
Upload the modules/ directory to the root of your WHMCS installation, merging with the existing structure:
/path/to/whmcs/
└── modules/
    └── servers/
        └── zabbix/
            ├── zabbix.php
            ├── ZabbixAPI.php
            └── lang/
                ├── english.php
                ├── russian.php
                └── ukrainian.php
2. Create a Zabbix API token
- Log in to your Zabbix admin panel as a Super Admin user
- Go to User settings → API tokens
- Click Create API token, set No expiry
- Copy the generated token — you will paste it into WHMCS in the next step
The token must belong to a Super Admin user. Tokens from regular Admin or User accounts cannot create host groups or manage users.
3. Create a user role in Zabbix
Go to Administration → User roles → Create user role.
This role is assigned to every client on this product. You can configure it however suits your service — the module has no requirements. A minimal starting point:
| Setting | Value |
|---|---|
| User type | User |
| Monitoring → Hosts | ✅ enabled |
| Monitoring → Problems | ✅ enabled |
| Dashboards | ✅ enabled |
| Data collection | ❌ all disabled |
| Administration | ❌ all disabled |
| Default access to new actions | ❌ unchecked |
Save the role and note its name — you will enter it in Module Settings.
4. Add a server in WHMCS
Go to Setup → Servers → Add New Server:
| Field | Value |
|---|---|
| Name | any label, e.g. Zabbix Production |
| Hostname | your Zabbix hostname, e.g. zabbix.example.com |
| Server Type | Zabbix Monitoring |
| Access Hash | paste your API token here |
| Secure | ✅ checked (HTTPS) |
Click Save Changes, then Test Connection — you should see a success message.
Test Connection performs two checks: first it calls apiinfo.version without auth to verify the server is reachable, then it makes an authenticated API call to verify the token is valid.5. Create a server group
Go to Setup → Server Groups → Create New Group, add the server from step 4.
6. Create a product
Go to Setup → Products/Services → Create New Product:
- Fill in name, pricing and billing cycle as usual
- On the Module Settings tab:
- Module Name:
Zabbix Monitoring - Server Group: select the group from step 5
- Module Name:
- Set the tariff parameters (see table below)
- Save
Tariff parameters
Set per-product in Module Settings. Each product can have different values.
| Parameter | Default | Description |
|---|---|---|
Hosts Limit | 5 | Maximum number of hosts the client can add |
Zabbix Role Name | client_basic | Name of the Zabbix role to assign (must exist in Zabbix beforehand) |
Example plans
| Starter | Business | Pro | |
|---|---|---|---|
| Hosts | 5 | 25 | 100 |
| Role | client_basic | client_advanced | client_pro |
Each role can have different API permissions, visible sections, and UI access — configured entirely in Zabbix.
Client portal
When a client views their active service they see:
- Username — their Zabbix login
- Hosts — current count vs limit (e.g.
2 / 5) - Open Zabbix — direct link to the Zabbix web UI
Host list
A table of all added hosts showing name, connection type and monitoring status. Each row has a Remove button.
Adding a host
The client fills in:
- IP address or hostname — validated before submission
- Connection type — one of:
Zabbix Agent— recommended; requires agent installed on the target serverSNMP— for network devices; uses port 161ICMP Ping— simplest; no agent required, just ping
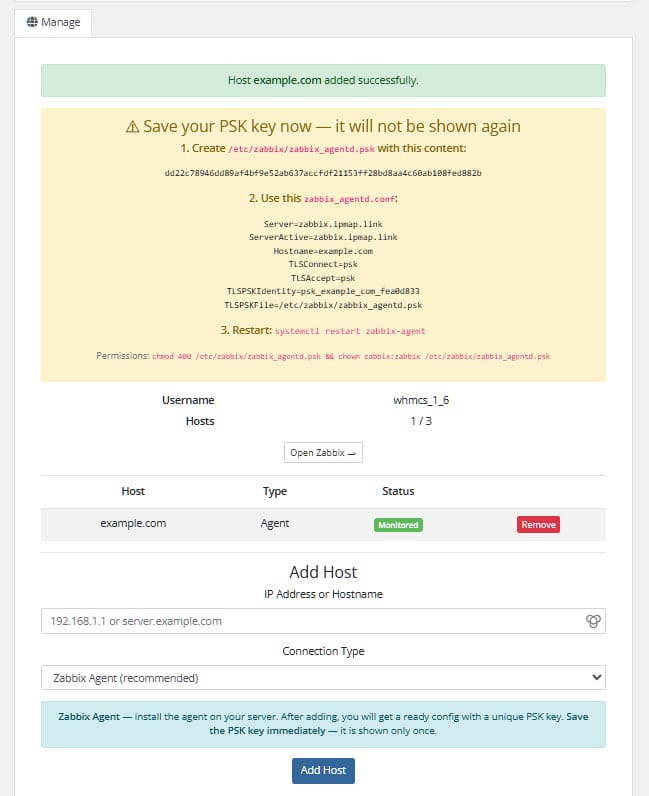
Zabbix Agent setup (shown after adding)
When connection type is Zabbix Agent, the client sees a one-time block with:
1. PSK file — save as /etc/zabbix/zabbix_agentd.psk:
a3f1c8... (64 hex characters)
2. Agent config — ready-to-use zabbix_agentd.conf:
Server=zabbix.example.com
ServerActive=zabbix.example.com
Hostname=client-server.example.com
TLSConnect=psk
TLSAccept=psk
TLSPSKIdentity=psk_client-server_a1b2c3d4
TLSPSKFile=/etc/zabbix/zabbix_agentd.psk
3. Permissions and restart:
chmod 400 /etc/zabbix/zabbix_agentd.psk
chown zabbix:zabbix /etc/zabbix/zabbix_agentd.psk
systemctl restart zabbix-agent
The PSK key is shown only once and is never stored. If the client loses it, they remove the host and add it again.
Localisation
Language files are in modules/servers/zabbix/lang/.
WHMCS automatically loads the file matching the system language (Setup → General Settings → Localisation). Falls back to english.php if not found.
To add a new language: copy lang/english.php to lang/<language>.php (lowercase, matching the WHMCS language name) and translate the values.
Security
| Area | How it is handled |
|---|---|
| SSL verification | CURLOPT_SSL_VERIFYPEER = true, CURLOPT_SSL_VERIFYHOST = 2 |
| SSRF via hostname | Hostname validated before use; private IP ranges blocked |
| HTTP redirects | CURLOPT_FOLLOWLOCATION = false — no redirect following |
| Header injection | API token stripped of newlines before use in headers |
| CSRF on client forms | Session token verified with hash_equals() |
| Host ownership | Before deleting a host, the module verifies it belongs to the client's group |
| Path traversal in lang | Language value filtered through preg_replace before use in file path |
| PSK keys | Generated with random_bytes(32) — cryptographically secure, never stored |
Troubleshooting
Test Connection fails
- Check the hostname is reachable from the WHMCS server on port 443
- Make sure the API token belongs to a Super Admin user
- Verify the Zabbix API is enabled in Administration → General → API
CreateAccount fails with "role not found"
- The role name in Module Settings must exactly match the role name in Zabbix (case-sensitive)
- Create the role in Zabbix first, then set up the product
Suspend fails
- The module creates a
whmcs_disabledusergroup on first suspend — make sure the API token has permission to create user groups
Client sees "Host group not found"
- The service was likely created before the module was installed, or CreateAccount failed silently
- Run Create from the admin service page to re-provision
CSRF token error in client portal
- This can happen if the client's session expired mid-page — refreshing the page resolves it
File structure
modules/servers/zabbix/
├── zabbix.php       — WHMCS module hooks (MetaData, ConfigOptions, all lifecycle functions)
├── ZabbixAPI.php    — Zabbix JSON-RPC API client
└── lang/
    ├── english.php
    ├── russian.php
    └── ukrainian.php
