
Free MailCow module for WHMCS

WHMCS provisioning module for Mailcow — automates creation, suspension, termination and password changes for email domains.
Features
- Automatic provisioning — creates a domain and domain administrator in Mailcow when an order is placed
- Suspend / Unsuspend — disables or re-enables the domain and its admin account on demand
- Terminate — removes all mailboxes, aliases, the domain and its admin in one action
- Change Password — changes the domain administrator password via the WHMCS interface
- Tariff plans — every product has its own mailbox limits, quotas and rate limits, set directly in WHMCS Module Settings; no shared config file needed
- DKIM management — clients can view DNS records and generate a DKIM key from the client area
- Localisation — English, Russian and Ukrainian included; any WHMCS language is supported
How it works
The module uses only the Mailcow super-admin API key — no separate administrator account is required. Each WHMCS service corresponds to exactly one domain in Mailcow. When a client needs an additional domain they order a separate product.
WHMCS order placed
    └─► CreateAccount
            ├─► POST /api/v1/add/domain       (with limits from Module Settings)
            └─► POST /api/v1/add/domain-admin (username + password from service)

WHMCS order suspended
    └─► SuspendAccount
            ├─► POST /api/v1/edit/domain       (active: 0)
            └─► POST /api/v1/edit/domain-admin (active: 0)

WHMCS order unsuspended
    └─► UnsuspendAccount
            ├─► POST /api/v1/edit/domain       (active: 1)
            └─► POST /api/v1/edit/domain-admin (active: 1)

WHMCS order terminated
    └─► TerminateAccount
            ├─► DELETE all mailboxes
            ├─► DELETE all aliases
            ├─► DELETE domain
            └─► DELETE domain-admin
Requirements
| Component | Version |
|---|---|
| WHMCS | 7.x \ 8.x \ 9.x |
| PHP | 7.4 or higher |
| PHP extensions | curl, json |
| Mailcow | any recent version with REST API enabled |
| API key | Read + Write (super-admin) |
Installation
1. Copy module files
Upload the modules/ folder to the root of your WHMCS installation, merging with the existing structure:
/path/to/whmcs/
└── modules/
    └── servers/
        └── mailcow/
            ├── mailcow.php
            ├── MailcowAPI.php
            └── lang/
                ├── english.php
                ├── russian.php
                └── ukrainian.php
2. Get a Mailcow API key
- Log in to your Mailcow admin panel
- Go to Configuration → Access → Edit administrator → expand the API section
- Create a key with Read + Write access
- Optionally restrict it to your WHMCS server IP
3. Add a server in WHMCS
Go to Setup → Servers → Add New Server:
| Field | Value |
|---|---|
| Name | any label, e.g. Mailcow Production |
| Hostname | your Mailcow hostname, e.g. mail.example.com |
| Server Type | MailCow |
| Access Hash | paste your API key here |
| Secure | ✓ checked (HTTPS) |
Click Save Changes, then Test Connection — you should see a success message.
4. Create a server group
Go to Setup → Server Groups → Create New Group, add the server you just created.
5. Create a product
Go to Setup → Products/Services → Create New Product:
- Fill in the name, pricing and other details as usual
- On the Module Settings tab:
- Module Name:
MailCow - Server Group: select the group from step 4
- Module Name:
- Configure the tariff parameters (see table below)
- Save
Tariff parameters
These are set per-product in Module Settings. Each product/plan can have different values.
| Parameter | Default | Description |
|---|---|---|
| Aliases Limit | 100 | Maximum number of aliases for the domain |
| Mailboxes Limit | 10 | Maximum number of mailboxes |
| Mailbox Quota (MB) | 1024 | Maximum storage per individual mailbox |
| Default Mailbox Quota (MB) | 1024 | Pre-filled quota in the "Add mailbox" form |
| Total Domain Quota (MB) | 10240 | Combined storage limit for all mailboxes in the domain |
| Rate Limit Value | 10 | Number of messages allowed per rate-limit frame |
| Rate Limit Frame | s | Time frame: s = second, m = minute, h = hour, d = day |
Example plans
| Starter | Business | Unlimited | |
|---|---|---|---|
| Mailboxes | 5 | 25 | 9999 |
| Mailbox Quota | 512 MB | 2048 MB | 10240 MB |
| Total Domain Quota | 2560 MB | 51200 MB | 999999 MB |
| Aliases | 20 | 200 | 9999 |
| Rate Limit | 10/s | 50/s | 500/s |
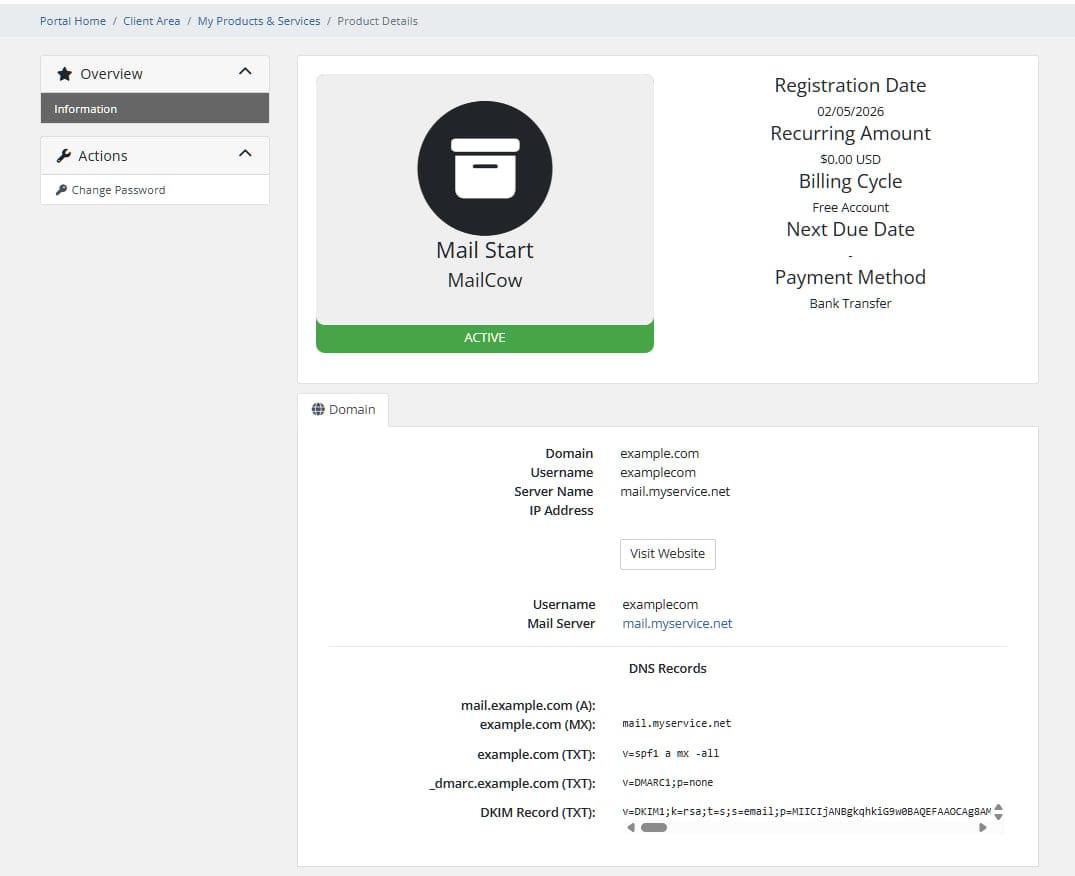
Client area
When a client views their active service, the module shows:
- Username — the domain administrator login
- Mail server — a link to the Mailcow panel
- DNS records — ready-to-copy records: A, MX, SPF, DMARC and DKIM
- Generate DKIM button — appears if no DKIM key exists yet; creates a 2048-bit key
The password is intentionally not displayed. If the client needs to change it, they can use the Change Password button in the service details page.
Localisation
Language files are located in modules/servers/mailcow/lang/.
WHMCS automatically loads the file that matches the system language setting (Setup → General Settings → Localisation). If the file for the selected language is not found, english.php is used as a fallback.
To add a new language:
- Copy
lang/english.phptolang/<language>.php(use the same name as your WHMCS language, lowercase — e.g.german.php,polish.php) - Translate the values on the right side of each line
- Save — no other changes needed
Upgrading from v1
Back up your existing module folder before upgrading.
- Replace all files in
modules/servers/mailcow/with the new ones - Delete the old
config.php— it is no longer used - For each existing product, open Module Settings and enter the values that were previously hardcoded in
config.php
The database and existing services are not affected. Active domains in Mailcow will continue to work without interruption.
Security notes
- The module uses HTTPS with full SSL certificate verification (
CURLOPT_SSL_VERIFYPEER = true,CURLOPT_SSL_VERIFYHOST = 2). Make sure your Mailcow server has a valid certificate. - The server hostname is validated before use to prevent SSRF attacks.
- Language file loading is protected against path traversal.
- DKIM generation forms include CSRF token verification.
- Passwords are never rendered in the client area.
Troubleshooting
Test Connection fails
- Check that the hostname is correct and reachable from the WHMCS server
- Make sure the API key has Read + Write permissions
- Check that the Mailcow API is enabled in Configuration → Access
- If you use IP restrictions on the API key, add the WHMCS server IP
CreateAccount returns an error
- Open Utilities → Logs → Module Log in WHMCS — the full API response is logged there
- Verify the domain does not already exist in Mailcow
- Check that the API key is a super-admin key (domain-admin keys cannot create domains)
DKIM button does nothing
- Check the module log for errors
- Confirm the domain is active in Mailcow before generating DKIM
An account is not created on the MailCow side.
- You must request a domain in the product settings when ordering.
- The API key on MailCow is set to read-only permissions. Write permissions must also be granted.
File structure
modules/servers/mailcow/
├── mailcow.php       — WHMCS module hooks (MetaData, ConfigOptions, all lifecycle functions)
├── MailcowAPI.php    — Mailcow REST API client
└── lang/
    ├── english.php   — English strings
    ├── russian.php   — Russian strings
    └── ukrainian.php — Ukrainian strings